
Converting to WebP takes a few dozen seconds with a free web tool. No install, no sign-up. Here’s how to choose.
| What you want to do | What to use |
|---|---|
| Finish one or a few images carefully | Squoosh—decide while comparing quality side by side |
| Convert dozens at once | Bulk Resize Photos—no limit on the number of files |
| Do one quickly on Windows | Paint—the built-in app can save it |
| Images going into WordPress | A plugin—converts automatically on upload |
Squoosh—converting one image carefully
An image conversion tool published by Google. Its biggest strength is that you can compare the original and the converted version side by side, so you can see with your own eyes how far you can push the quality down. Images are processed entirely on your computer and never uploaded anywhere.
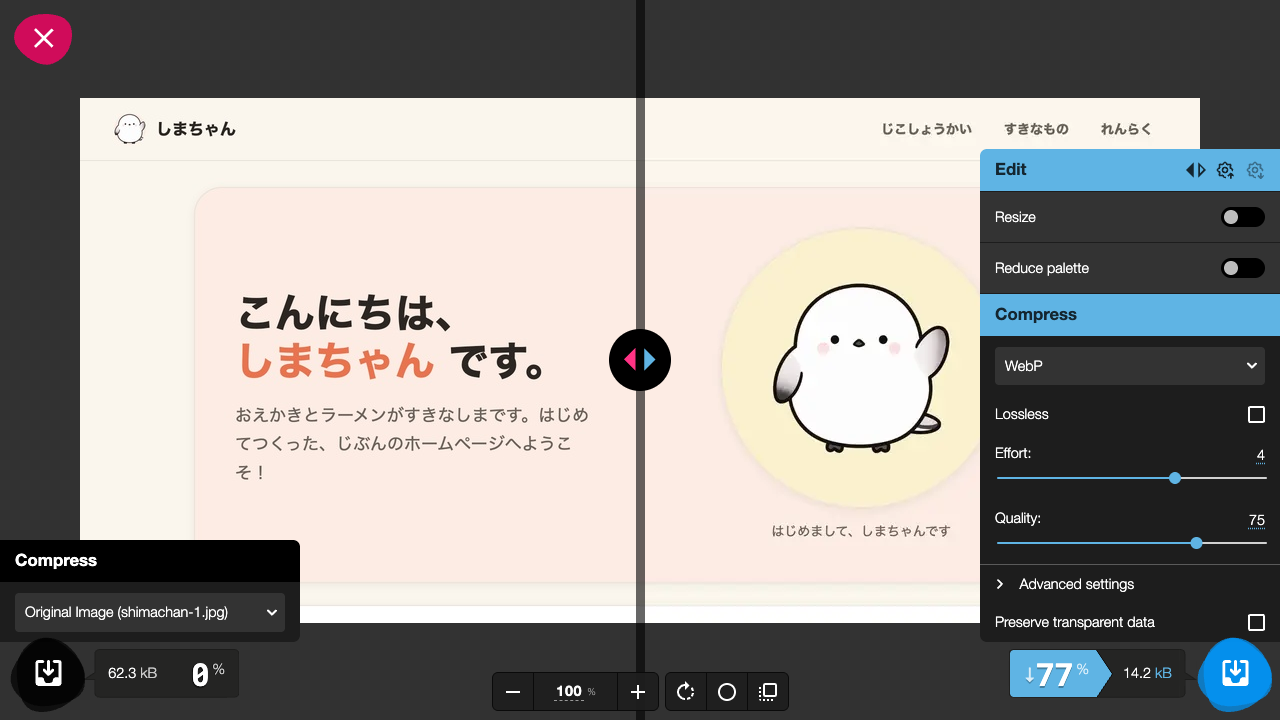
Four steps.
- Drag and drop the image onto the page
- Choose WebP in the Compress menu on the right
- Move Quality and compare the two sides to decide (around 75 is a good target)
- Save with the blue download button at the bottom right
Bulk Resize Photos—converting dozens at a time
For batch conversion this is the clear winner. There’s no limit on the number of files, and conversion happens entirely on your computer (which is faster, since nothing is uploaded). No sign-up either.
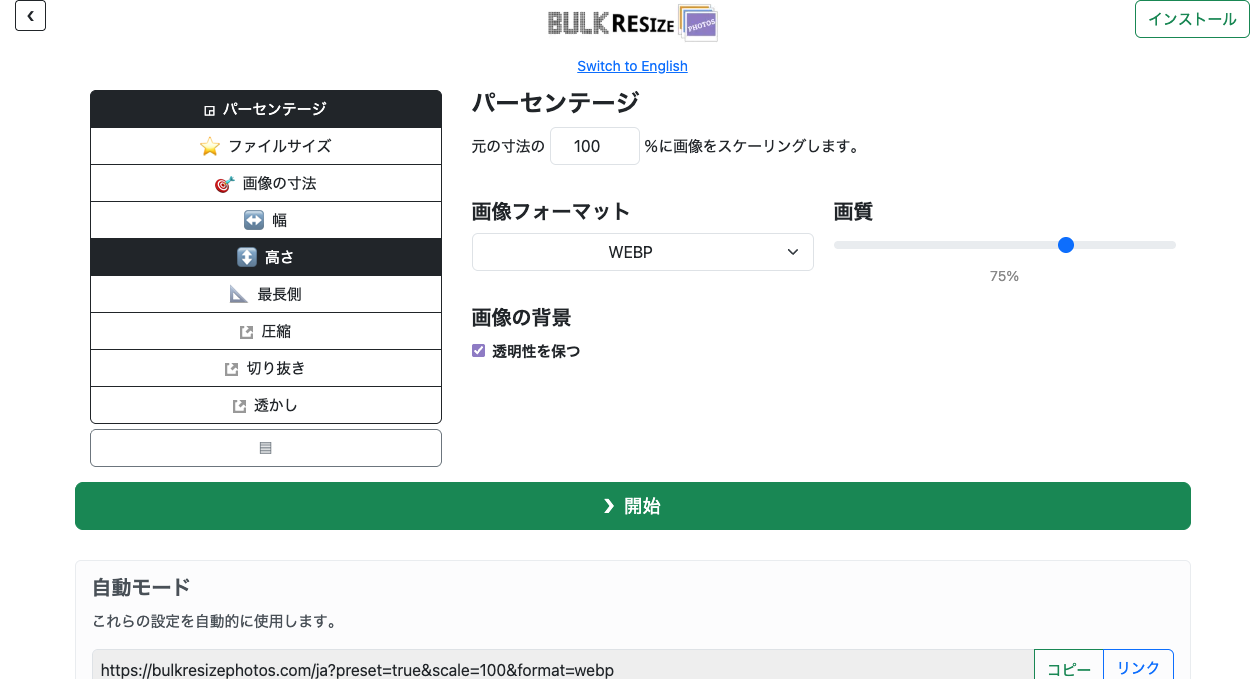
- Use “Choose Images” and select all the images you want to convert
- Choose WEBP under image format
- If you’re not changing dimensions, set the percentage to 100 (lower it here if you also want to scale down)
- Leave quality around 75 and press start—a ZIP downloads
The name says “resize,” but being able to scale down and convert format in one pass is this tool’s strength. File names stay the same with only the extension changing to .webp, so updating your references afterwards is straightforward.
Can the built-in apps convert? (Windows and Mac)
If software already on your computer can do it, that’s the easiest route. Support breaks down like this.
| Software | Saving as WebP |
|---|---|
| Paint on Windows 11 | Yes—choose WebP as the file type under “Save as” |
| Preview on Mac | No—it opens WebP but can’t export it |
| Photoshop | Yes—supported natively from the 2022 versions onward |
| GIMP (free software) | Yes—specify .webp under “Export As” |
Only Mac can’t convert with a built-in app, so the web tools above are the quick answer there.
Don’t forget these after converting
Update the src in your HTML
The extension changes, so update whatever loads it. Forget this and the images stop displaying.
<img src="images/photo.jpg" alt="A photo of Shima">   <!-- before conversion -->
<img src="images/photo.webp" alt="A photo of Shima">  <!-- after conversion -->
The same goes for images set as background-image in CSS. Searching for the converted file names and replacing them all at once is the reliable approach.
Keep the originals
WebP’s default is lossy compression that discards information, so quality drops every time you convert again. Keep the original JPGs and PNGs in a separate folder and convert only the copies you publish—that’s the safe workflow.
Fallback images are no longer necessary
You’ll see guides saying “prepare a JPG as well for browsers that don’t support WebP,” but every major browser supports WebP now. On a personal site, you don’t need to bother preparing two files with a picture element.
WordPress can automate this
WordPress has plugins that automatically convert uploaded images to WebP (EWWW Image Optimizer is a standard choice). They can also convert the images already in your media library in bulk, so the more articles you have, the bigger the payoff.
TipsMaking WordPress faster (in order of impact)What to do when WordPress feels slow, ordered by impactDon’t stop at converting—scale down too
Even as WebP, a 4000px-wide phone photo is still heavy. Scale down to about twice the width you display it at before converting and the file size drops dramatically.
TipsMake images lighter to speed up your pageHow to scale down and compress, and what file sizes to aim forSummary
- Squoosh for one image, Bulk Resize Photos for many—both free, no sign-up, nothing uploaded
- Start quality at around 75. For transparent illustrations, try Lossless too and take whichever is lighter
- After converting, update your
srcreferences and keep the originals—always as a pair