CSS・More control over the look

Wrap it in a border

From here to here is one chunk — a border makes each block stand out clearly. Use border to set width, style, and color all at once.

“Everything from here to here is one chunk” — a border is what makes that visible to the eye. Boxing off a note, drawing the edge of a card. With just border, the shape of a part becomes much clearer.

Let’s write one

.box {
  border: 2px solid teal;
}

A part with class="box" gets a teal border. The three things lined up after border each mean this:

  • 2px … the width of the line (number + unit)
  • solid … the style of the line (solid is a plain solid line)
  • teal … the color of the line (a color name or code)

You can read it left to right: “a 2-pixel, solid, teal border.” Being able to write all three at once, joined by spaces, is what makes border so convenient.

Change the line style (solid, dashed, dotted) and the border’s look changes like this.

Just by swapping the three parts — width, style, and color — the impression of the border changes. Start with solid.
CSSCreate breathing room with spacingRemember how to make inner spacing — combined with a border, it really comes into its own

Adding a line to just one side

border puts a line on all four sides, but with a direction-specific name like border-bottom (bottom only) or border-left (left only), you can add a line to just one side.

.header {
  border-bottom: 1px solid #e9e3d9;
}
.quote {
  border-left: 4px solid #e8734e;
}
Bottom only, left only — a line on a single side plays the role of a “divider” or a “marker.”

border-bottom is often used to draw a line at the bottom edge of a header to show “the header ends here,” and border-left to add a thicker line on the left of a quote to signal “this is a quote.” The same idea works for all four directions with -top and -right too.

When you want to remove a border: border: none;

Buttons (<button>) and input fields (<input>) come with a border from the start. When you want to style them your own way, a common move is to clear it first with border: none;.

.btn {
  border: none;
  background-color: teal;
  color: white;
}

Not just “adding a line,” but “removing the default line” too — that’s one of border’s important jobs.

Summary of this lesson

  1. A border is border
  2. Line up width, style, and color, separated by spaces
  3. Think of a border and padding as a set so things don’t feel cramped
  4. Use border-bottom / border-left to add a line to just one side

Try it: add lines to the header and the quote

Add class="lp-header" to the header, and class="quote" to the quote of your favorite words.

<header class="lp-header">
  ...
</header>
.lp-header {
  border-bottom: 1px solid #e9e3d9;
}
.quote {
  border-left: 4px solid #e8734e;
  padding: 14px 18px;
}

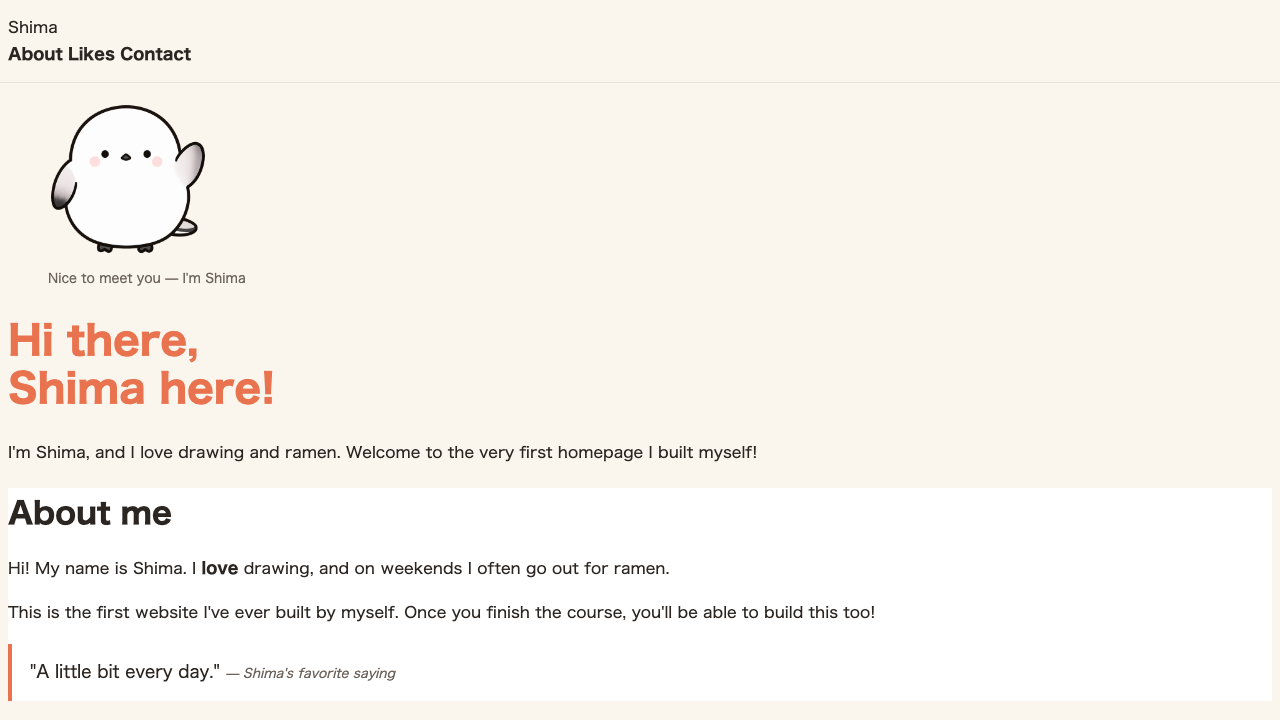
A single light gray line at the bottom edge of the header. A single thick orange line on the left of the quote. Even within the same border family, just changing the direction changes the role.

Browser view. A faint line under the header, and a thick orange line on the left of the self-introduction quote
Just one line, and “the header ends here” and “this is a quote” come across at a glance.

Once the shapes are clear, let’s finish by rounding the corners for a softer look.

FAQ

Why does an element look bigger when I add a border?
Because the element grows outward by the thickness of the border. A little later you'll learn box-sizing: border-box;, which lets you draw the border while keeping the size you specified.
What if I only want a line on the top and bottom, or just the sides?
Specify only the sides you need with border-top, border-right, border-bottom, and border-left, and you can add lines in any combination you like.
How do I remove a border?
border: none; removes it. Buttons and input fields often come with a border by default, so this is handy when you want to style them your own way.